Simple Tips To Tie A Tie

Comprehensive Insights and Gallery of Simple Tips To Tie A Tie

Simple Tips to Tie a Tie: A Comprehensive Guide

Tying a tie can be a daunting task, especially for beginners. However, with a few simple tips and tricks, anyone can master the art of tying a tie. In this article, we will provide you with a step-by-step guide on how to tie a tie, including the basic and advanced knots.

Basic Knots: Four-in-Hand and Half-Windsor

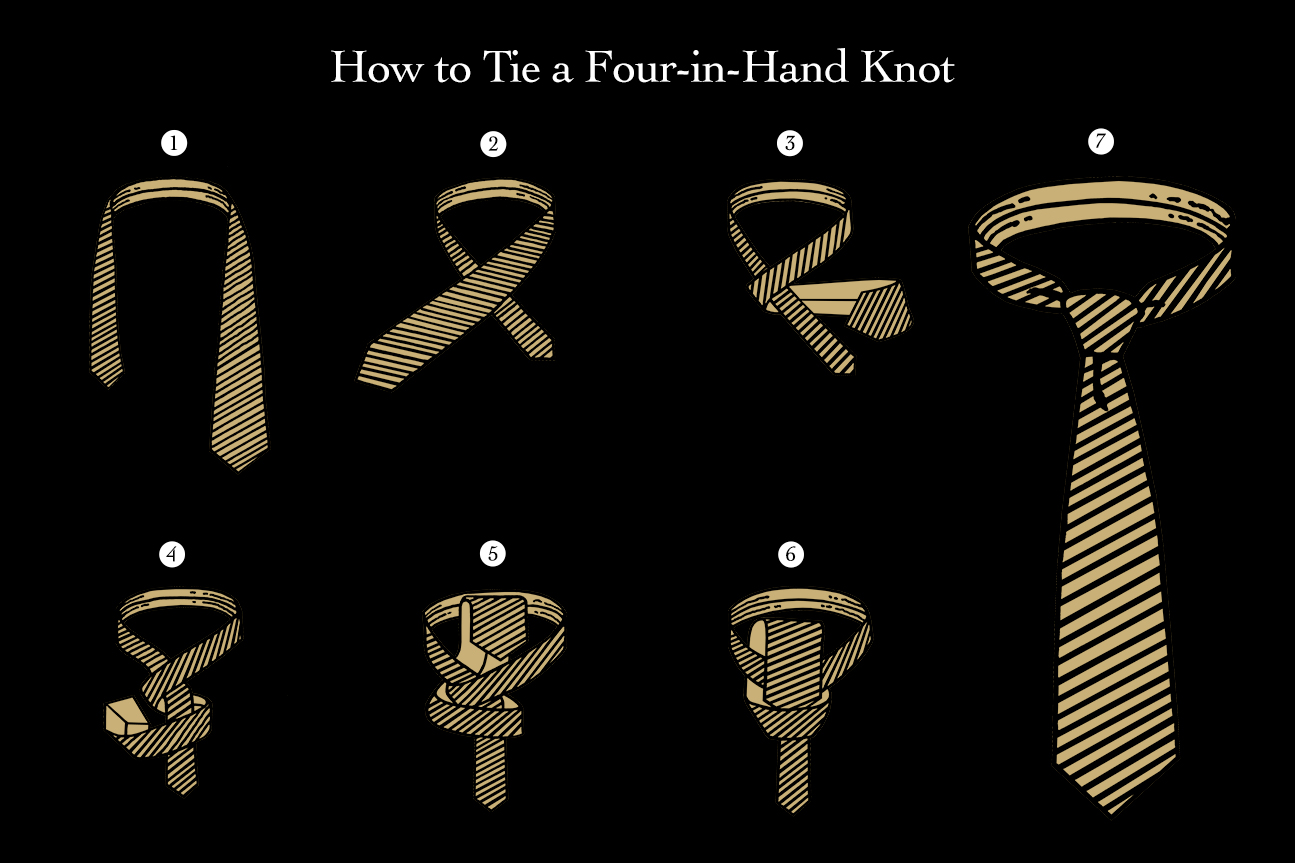
The Four-in-Hand and Half-Windsor are two of the most common knots used for tying a tie. These knots are easy to learn and can be used for casual and formal occasions.

Four-in-Hand Knot

The Four-in-Hand knot is a simple and classic knot that works well for most collared shirts. 1.
Step 1: Begin by facing a mirror and standing up straight.
2.
Step 2: Place the tie around your neck with the wide end on your left side and the narrow end on your right side.
3.
Step 3: Cross the wide end over the narrow end, so that it forms an "X" shape.
4.
Step 4: Take the wide end and pass it behind the narrow end.
5.
Step 5: Bring the wide end up and over the knot, so that it forms a loop.
6.
Step 6: Take the wide end and pass it through the loop.
7.
Step 7: Pull the wide end gently to tighten the knot.

Half-Windsor Knot

The Half-Windsor knot is a bit more complex than the Four-in-Hand knot, but it is still a simple and elegant knot. 1.
Step 1: Begin by facing a mirror and standing up straight.
2.
Step 2: Place the tie around your neck with the wide end on your left side and the narrow end on your right side.
3.
Step 3: Cross the wide end over the narrow end, so that it forms an "X" shape.
4.
Step 4: Take the wide end and pass it behind the narrow end.
5.
Step 5: Bring the wide end up and over the knot, so that it forms a loop.
6.
Step 6: Take the wide end and pass it through the loop from underneath.
Simple Tips To Tie A Tie
7.
Step 7: Pull the wide end gently to tighten the knot.

Advanced Knots: Windsor and Eldredge

The Windsor and Eldredge knots are more complex and elegant knots that are perfect for formal occasions.

Windsor Knot

The Windsor knot is a classic and timeless knot that works well for formal events. 1.
Step 1: Begin by facing a mirror and standing up straight.
2.
Step 2: Place the tie around your neck with the wide end on your left side and the narrow end on your right side.
3.
Step 3: Cross the wide end over the narrow end, so that it forms an "X" shape.
4.
Step 4: Take the wide end and pass it behind the narrow end.
5.
Step 5: Bring the wide end up and over the knot, so that it forms a loop.
6.
Step 6: Take the wide end and pass it through the loop from underneath.
7.
Step 7: Pull the wide end gently to tighten the knot.
8.
Step 8: Adjust the knot so that it is centered and the edges are even.

Eldredge Knot

The Eldredge knot is a bit more complex than the Windsor knot, but it is still a simple and elegant knot. 1.
Step 1: Begin by facing a mirror and standing up straight.
2.
Step 2: Place the tie around your neck with the wide end on your left side and the narrow end on your right side.
3.
Step 3: Cross the wide end over the narrow end, so that it forms an "X" shape.

Gallery Photos

Related Topics

Resume Writing Services For FreelancersBest Clippers For Thick Hairy BreedsYoutube Channel Setup For Non-Profit OrganizationsAcne Removal Treatments For AcneElectronic Device TroubleshootingE Motorcycle Gauge ClusterDisplay Screen Replacement RequirementsCybersecurity For Online Education PlatformsCauses Of Excessive Screen TimeBlue Light And Digital Eye StrainRemove Digital Footprints From Online Platforms OnlineHow To Start A Youtube Channel With A Small BudgetHow To Set Up Roku Tv AppIphone Charging Port Not Working FixFomo And Its Effects On Customer RetentionYamaha Electric Road BikeCreating And Selling An Online Artificial Intelligence ProductBed Bug Removal SolutionsMobile Pet Grooming Business Tv Advertising TipsWeight Loss Motivation For People With Me/CfsCure For Hiccups Caused By Eating Too QuicklyTile Design
📜 DMCA âœ‰ī¸ Contact 🔒 Privacy ÂŠī¸ Copyright