How to Write a Check for a Payment: A Step-by-Step Guide
In today's digital world, writing a check may seem like an old-fashioned way to make payments. However, with the increasing scrutiny of digital transactions, many individuals and businesses still rely on paper checks for secure and reliable payments. Whether you're paying a bill, making a donation, or settling a debt, knowing how to write a check correctly is essential. In this article, we'll walk you through the process of writing a check for a payment and provide you with a comprehensive guide to ensure your transaction is handled smoothly.
Why You Should Know How to Write a Check
While digital payments are convenient, they may not always be the most secure or reliable option. With a paper check, you can avoid potential issues like fraudulent transactions, delayed funds, or bank account breach. Writing a check also provides a valuable skill for everyday life, whether it's paying a vendor, settling a debt, or making a donation. In addition, knowing how to write a check can help you maintain a healthy relationship with your bank and avoid unnecessary fees.
Step 1: Start with the Basics
The first step in writing a check is to ensure you have the necessary information. You'll need to know the date, recipient's name, and amount of the payment. Make sure to check the following:
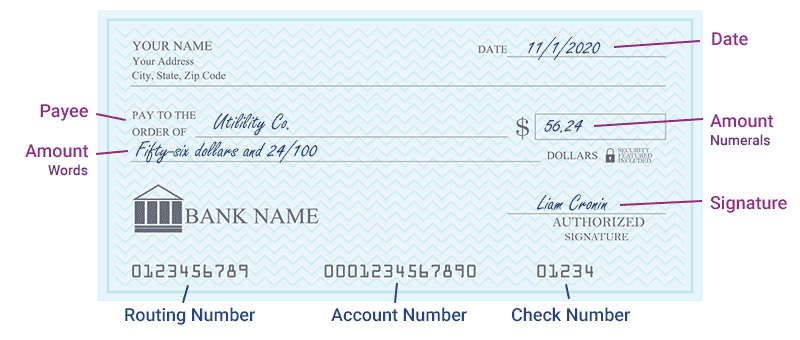
- Check the date: The current date should be in the upper right corner of the check.
- Recipient's name: The payee's name should be printed clearly in the "Pay to the order of" line.
- Amount of the payment: The amount should be written in both numerical and written form, with the dollars indicator (£ or $).
Step 2: Write the Date
Begin by writing the current date in the upper right corner of the check. Ensure the date is in the correct format (month/day/year). This date is critical, as it signifies the validity of the payment.
Step 3: Write the Recipient's Name
Print the recipient's name clearly in the "Pay to the order of" line. Make sure the name is spelled correctly, as any errors may lead to delays or complications.
Step 4: Write the Amount
Next, write the amount of the payment in both numerical and written form. The numerical amount should be to the right of the dollar sign ($), followed by the written form on the line below. For example:
Step 5: Sign the Check
Finally, sign the check in the bottom right corner. Ensure the signature matches the name printed in the "Pay to the order of" line, as any discrepancies may invalidate the payment.
Tips and Reminders
To ensure your check is processed correctly, remember the following:
- Always use a pen to sign the check.
- Never alter a signed check.
- Make a record of the payment, including the date, amount, and recipient's name.
Conclusion
Writing a check for a payment is a relatively straightforward process, but it requires attention to detail and knowledge of the essential steps. By following this comprehensive guide, you'll be able to confidently write a check for a payment and avoid potential complications. Whether you're paying a bill, making a donation, or settling a debt, knowing how to write a check is an essential skill for everyday life.
Additional Resources
For more information on writing checks, balancing your checkbook, and maintaining a healthy relationship with your bank, visit the following resources:
- GrammarCheck: A free online grammar checker to ensure your check is written correctly.
- Bank of America: Learn about rates and fees for your Bank of America accounts.
- IRS: Find information on how tax deductions work and 25 tax breaks that might come in handy.


 - wikiHow")

:max_bytes(150000):strip_icc()/Balance_Pay_To_Cash_Checks_315313_V3-ca26385d4eb74c2db14188d577f7ebf4.jpg "Individual Income Tax Payment Options | Virginia Tax")


